
Manual
| Table of Contents |
|---|
| Difficulty |
| Controls |
| Weapons |
| Comfort |
| Performance |
| Developer |
Difficulty
The standard Easy, Medium, and Hard options are available.
Players may want to keep in mind that due to the VR controls and interactions the game will feel much more difficult than the base game, due to changes like manual reloading, and adjust their desired difficulty accordingly.
Laser Pointer for weapons
A laser pointer can be enabled to make aiming weapons easier. Enabling this option does not affect any other gameplay, and does not count as a cheat.
Quick Reload
This option is available to simplify the reloading process. When Quick Reload is enabled, the player can press the Eject Magazine button then drop their weapon hand to their waist, pointed down to the ground. After a moment, the weapon will automatically reload the relevant ammo. Any unspent ammo in the previous magazine will be automatically recovered.
(See the Controls section for details on the default manual reloading procedure.)
Controls
The controls are fully customizable via SteamVR’s controller bindings menu. Below, we will explain the default bindings, but you can always make your own modifications to suit your needs, or use community bindings another user has created and shared.
Default Controls
Half-Life 2: VR Mod aims to support both right- and left-handed players. If you change the primary hand, all controls will be swapped accordingly.
For example, if you enable left-handed mode, then you will hold weapons in your left hand and move with the right stick.
If you don’t like the default control bindings or options, you can use the SteamVR Controller Bindings menu to customize your own setup. You can make you own changes, or or use a community-made shared preset.
The guide below will assume that the right hand is the primary hand and the left hand the off hand.
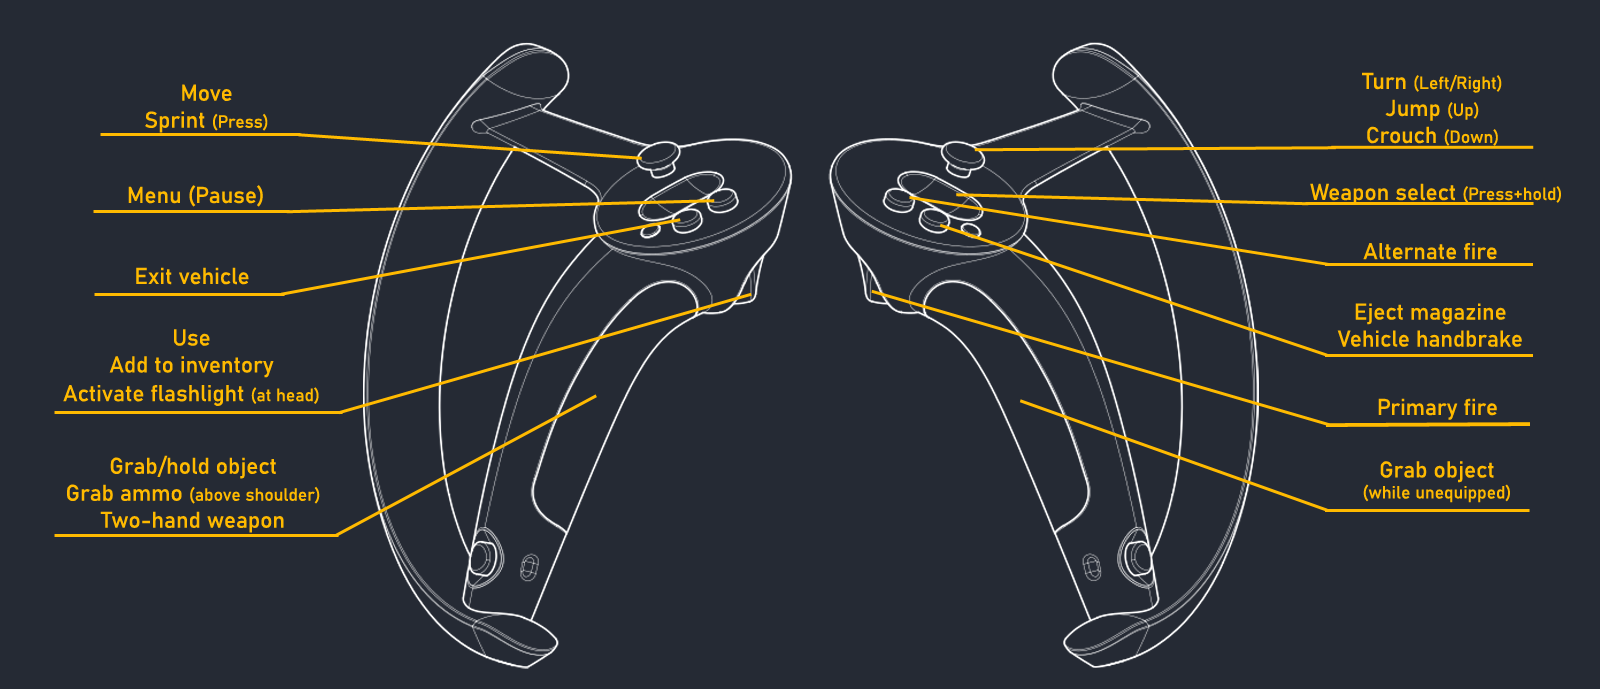
Valve Index
Oculus Touch and Meta Quest

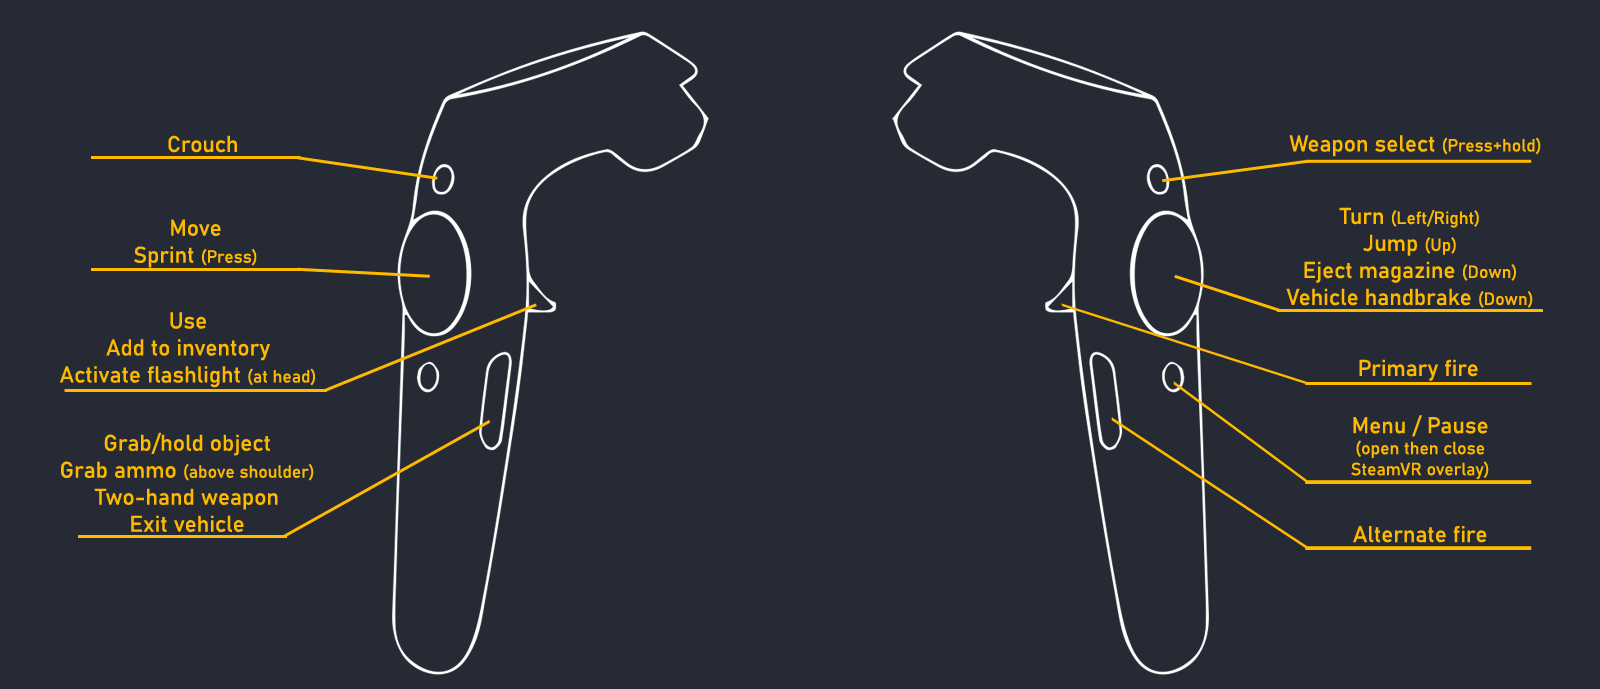
HTC Vive
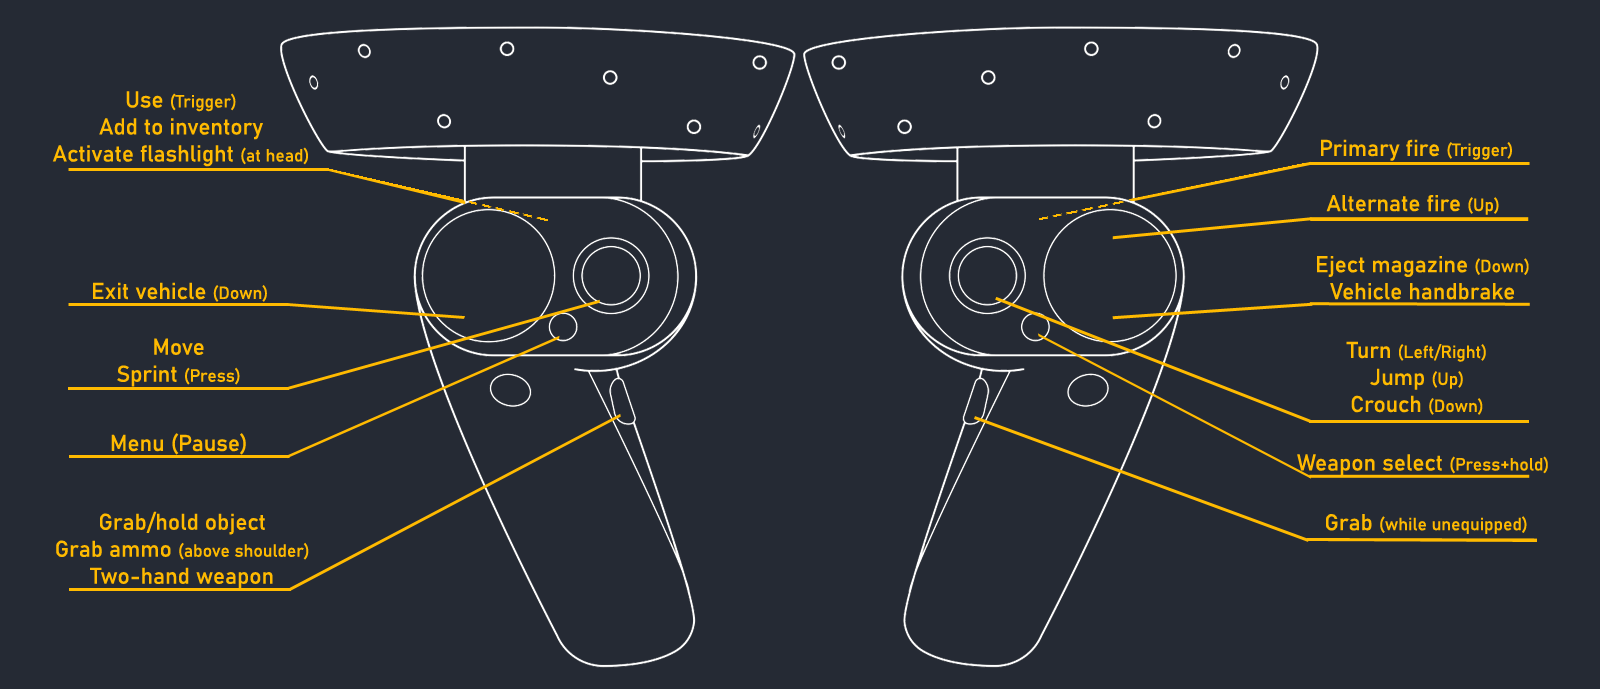
Windows MR
Dominant Hand
Use this option to select your primary hand. By default, this is set to right hand.
Movement options
By default, smooth locomotion is enabled. The off-hand stick controls your movement through the world. You can also freely move around in the real world; your roomscale position will be reflected in the game.
Movement direction can be set to one of multiple options, including off-hand direction and head direction.
Acctivate Sprint by pressing in the movement stick. This will remain active until you return the stick to its neutral position.
You can artificially turn with the primary hand stick. By default, snap turn is active with a 30° turn amount. You can change the turn amount using the “Snap turn degrees” setting in the Controls options. Setting this to “0 (Smooth)” will enable continuous smooth turning.
Toggle crouch by moving the right stick down. Alternatively, the player can physically crouch.
Jump by moving the right stick up. The player physically jumping is not recommended…
Teleport movement options
Two Teleport movement options are available in the Options - Controls menu. You can choose Teleport movement exclusively, in which case both the movement stick as well as the Jump input will instead be used to select a teleport target. Or you can choose to retain regular movement on the movement stick and only replace the Jump input with teleport.
On land, teleport targeting should mostly work as expected. You may need to point upwards a little to “jump” onto obstacles, and you need to point downwards if you want to drop from greater heights. Note that you also need to crouch (either in real life or with the crouch toggle input) to teleport into vents and other places with limited vertical space.
In water, you can teleport in any direction. Point downwards to dive into the water, and upwards to return to the surface. Point upwards towards land to get out of the water.
For ladders, stand at a slight distance in front of them and point the teleport up or down towards the ladder. An arrow will light up and show you which direction you are going.
Please understand that selecting teleport movement will not eliminate all artificial movement in the game. Due to the game’s design, the player is ultimately subject to events from the physics engine. Some enemies can push or even launch you back, and you will slide on certain terrain, so be prepared for that.
World interactions and Item pickup mode
The player can grab items in each hand by pressing the Grip button (or squeezing the Index controllers). Release Grip to let go. Grabbable items will be highlighted in the world when you are close enough to pick them up.
By default, you need to pick up consumables like health or battery packs and weapons to consume them. If you prefer the automatic pickup from the original game, you can change this in the Options menu.
The Trigger on each controller is your “Use” key. Use it to interact with buttons, levers, NPCs, doors, and more. Your hand needs to be close to your interaction target.
The Trigger on your primary hand can be used as the “Use” key only while your weapon is unequipped.
Ladders
By default, “immersive” ladder climbing is active. Grab the ladder by squeezing your Grip button(s) to climb the ladder. You will need to unequip your weapon if you wish to climb with two hands. (But extremely stubborn users can find ways to climb with just one.)
To dismount a ladder: When you are near where you’d like to dismount, look towards your target location to see the in-game icon indicating where you will dismount the ladder. Then, simply release the Grip button on both controllers to move to the indicated spot.
If you prefer stick-based ladder climbing (similar to the original game), you can enable this in the Comfort options.
Dismounting in this mode can be done with the movement stick or Jump action.
Flashlight
You can activate and deactivate your flashlight by pressing either controller’s Use button (Trigger by default) near or in front of your head.
Users with inside-out tracking (like the Quest) may have better luck activating this near the front of the face where the controller is more easily tracked.
Weapons
HL2VR is designed to feel close to a native VR title, and weapon handling has been updated accordingly.
Weapon selection and firing
Press and hold the primary hand stick (or touchpad on Index controllers) to open the weapon selection menu. The available weapons from your inventory are shown in a hexagonal grid. Move your right hand towards the icon of the weapon you want to equip, then let go of the right stick to close the menu.
The weapon selection menu is controlled by your hand’s position; it is not a pointer.
It may take some practice, but the menu is designed so that you can quickly switch to your desired weapons even without looking.
We recommend allowing yourself some time to build the necessary muscle memory, and it will become second nature! :-)
Once equipped, aim the weapon with your primary hand. Pull the Trigger to fire the weapon. Many weapons can be stabilized using the off-hand to reduce recoil (see Two-handing weapons).
Some weapons have an alt-fire, which is activated by pressing the primary hand B button.
To throw grenades or bugbait, press and hold the Trigger of your primary hand to arm the grenade.
Make a physical throwing motion with your controller and let go of the trigger at the end to throw the grenade.
It can be challenging to accurately aim a grenade throw. Press and hold the alt-fire button to enable an alternative throw mode. You will be presented with a visual arc that you can use to aim your throw. Release the button to throw the grenade along the arc.
(This can be particularly useful when trying to deal with enemies hiding in small spaces or in open windows!)
Reloading
HL2VR sports two options for reloading. The default is the “manual” reload, in which there are a few steps to reloading a weapon. We find this to be the most satisfying, but it can also be difficult for some users in stressful situations. For users that prefer a less complex approach, we’ve also included a simpler “quick” option.
“Manual” reload mode:
This option is enabled by default.
To reload, first press the primary hand A button to eject the magazine (if applicable).
When you eject the magazine, all ammo remaining in the magazine is ejected with it. You can pick up (or catch) the magazine using the Grip button and it will be instantly consumed and added back to your inventory. You can also leave them on the ground for a while before picking them up, if you’re… preoccupied elsewhere.
Once ejected, a magazine can’t be held, only added back to inventory.
To grab a fresh magazine from your inventory, press and hold your off-hand’s Grip button near your shoulder.
Pistol & SMG: Insert the magazine into the magazine well.
Revolver: Tilt the gun back to empty the previous clip. Insert the new clip. Flick your hand (or press the Eject Magazine button again) to close the chamber.
Pulse Rifle: Snap the space-magazine onto the space-magazine well on the bottom of the gun.
Shotgun: Insert shells into the loading port on the bottom of the gun (in between the trigger and barrel).
Crossbow: Nock a bolt to the far end of the rail (it will automatically draw itself back).
RPG: Slide the tail end of the rocket into the front end of the launcher.
Some weapons, when completely emptied, will require additional action to chamber a round from the new magazine. The first few times this happens, this will also be indicated with a subtle highlight on the weapon model.
Pistol: Grab the slide at the top of the gun and pull it back to chamber your first bullet.
SMG: Grab the charging handle at the back of the gun and pull it back to chamber your first bullet.
Shotgun: Pull the forestock back then forward again to chamber your shell.
“Quick Reload” mode:
This option can be enabled in the Difficulty options menu.
In “quick” reload mode, press the right A button to eject the magazine (if applicable).
The weapon can then be reloaded by dropping it to your waist, aiming at the ground, and simply waiting a moment.
The weapon’s usual visual and audio reload cues will play to indicate when this is complete.
In this mode, when a magazine is ejected it is automatically emptied and the remaining ammo is added back to your inventory. (The empty magazine will still drop to the ground.)
Melee attacks
To attack with the crowbar, you need to physically swing it to damage enemies or crates. Attack damage scales, to some extent, based on your swing’s distance and speed.
There is a minimum requirement on both the swing speed and distance to do damage. There is also a brief cooldown period between attacks. This means you should make your attacks meaningful - we do not encourage waggling. :-)
Swinging props or weapons other than the crowbar does not do any damage. (We would have loved to implement this, but it’s quite difficult!)
Two-handing weapons and recoil control
Almost all weapons can be held with both hands. When the weapon is equipped, move your off-hand near the handle or grab point, and press and hold the Grip button to hold on to the weapon.
Some weapons gain a benefit of slightly reduced recoil with a two-hand grip:
Pistol
Some weapons expect you to use two hands. Holding these in both hands reduces recoil significantly, and is the intended way to use the weapon:
SMG, Combine Pulse Rifle
The Shotgun requires the use of two hands, as you will have to pump it after every shot. To do so, grip it with both hands, pull in your off-hand towards your primary hand, then move it back. If both parts of the pump aren’t complete, the weapon won’t fire. (You will hear a sound for each part of the pump.)
And lastly, some weapons have a two-handed Grip purely for aesthetic or immersion reasons:
Revolver, Gravity Gun, RPG
Vehicles
To enter a vehicle, press either hand’s Trigger (while not holding anything) near the vehicle.
Accelerate and brake are controlled by the Right and Left Trigger, respectively. (Left-handed users will find their Accelerate on the left Trigger, and will likely want to use SteamVR’s input bindings menu to swap them.)
Steering is controlled with the off-hand stick like normal movement.
The buggy’s boost is activated by pressing the off-hand stick in. The buggy’s handbrake is activated with the primary hand A button.
The airboat’s headlights are activated by pressing the primary hand stick in.
If the vehicle is equipped with a weapon, use your primary hand to aim the weapon and press the Trigger to fire it. If available, you can activate alt fire via the right B button.
Use the “Vehicle weapon aim” option to change this from main hand to head or off-hand tracking.
To exit the vehicle, press the off-hand controller A button.
Comfort options
We’ve incorporated a variety of comfort options to help more players experience HL2VR.
Movement vignette
A standard movement vignette is available.
While moving, the borders of your screen will be blackened, reducing your field of view and the impact of motion sickness.
Seated mode
This mode fixes Gordon’s in-game height to match the base game regardless of the player’s headset position.
To properly utilize this feature, enable it in the Options menu, then use the “Recalibrate view” button on the Pause menu.
Vehicle mode
By default, “fixed horizon” is enabled. This allows your view to move with the vehicle, but disables any view rolling. (This means you can be moved around, and the vehicle can flip, but your view always remain upright.)
The “no comfort” mode is available for roller coaster enthusiasts. Do not use this unless you’ve got an iron stomach.
The “decoupled camera” option enables artificial turning while in vehicles, allowing (and requiring) you to turn the camera independently from the vehicle’s orientation with the primary-hand stick, and control the vehicle with the off-hand stick. The movement stick is directional.
The “3rd person camera” changes the vehicle rides to a 3rd person camera perspective. In this mode, the camera follows the vehicle at a distance and is not directly subjected to the vehicle’s rapid movements and turns, which should reduce motion sickness dramatically. The movement stick is directional.
The “Teleporting camera” is another 3rd person camera option. The vehicles still move freely, but your camera does not - instead, it teleports in regular intervals to a third-person view just behind the vehicle. This is a somewhat experimental mode, and the most motion sickness prone users may prefer to use the following option:
The “projected 2D screen” mode moves the entire view to a floating screen in front of the user, and removes all 3D effects, essentially returning the experience to the flat version of Half-Life 2.
(The view returns to normal first-person VR when exiting the vehicle.)
This is the least immersive option, but it’s extremely effective as a comfort mode, and we hope it ensures everyone has a chance to get through the vehicle sections in the game.
Vehicle entry/exit mode
By default, a short animation plays when entering and exiting a vehicle. This option replaces the animation with a short fade to black to reduce artificial camera movement.
World scale
Players uncomfortable with the standard world scale can adjust it to be larger or smaller.
Performance
HL2VR’s overall performance relies heavily on your CPU’s single-thread performance. Due to engine limitations, HL2VR cannot be optimized like modern games. Users with older or low-end CPUs may have a harder than expected time running at their target resolution and framerate. (And, of course, higher framerate targets will have higher requirements.)
There are also a small handful of area in the game that still cause CPU bottlenecks, regardless of hardware. (Though the really problematic areas are few and far between, and typically quite short.)
CPU requirements
Users should aim to have at least a mid-range Intel 6th gen or Ryzen 2000 series CPU. At least mid-range Intel 8th gen or Ryzen 3000 are recommended, and mid-range Intel 10th gen or Ryzen 5000 or newer are ideal. Generally speaking, low-end models in most CPU generations may still struggle due to lower clock speeds (particularly on older architectures).
Water reflections can be disabled in the options menu, but it has a fairly minimal performance impact. Users with old/slow CPUs will benefit more from disabling this option.
GPU requirements
On the GPU side, it is notably more demanding than the base HL2, but they are still games from 2004-2007. We have had very few complaints about GPU requirements. :-)
Users with GPU headroom to spare may consider cranking up their render resolution in SteamVR to produce a slightly crisper image.
MSAA is also available for anti-aliasing. This can be taxing on your GPU, especially when combined with supersampling, so set accordingly. 4x is a good compromise.
Users with at least GTX 1060 6GB, GTX 1660, or RX 580 performance at 1440 on this “GPU hierarchy” list should have little trouble with performance at default resolution:
https://www.tomshardware.com/reviews/gpu-hierarchy,4388.html
Console window and Developer options
To enable the console, open the Options menu and select the console button in the bottom-left corner.
To enable the developer menu, add -vrdev to the launch options in Steam. This will enable the Developer tab in the Options menu, with which you can jump to any map, give yourself any weapon, and a number of other options and cheats.
Simply enabling the Developer menu does not count as a cheat for Achievement purposes, but there are many options within it that are most certainly cheats.
Note: Using -console or -dev will prevent the main menu from showing in the headset! You have to actually load into a level first before you will get anything to show in your HMD. There isn’t any real reason to use these options over -vrdev.